AI Photo to Photo NSFW Guide 2026: Complete img2img Workflow
Transforming regular photos into NSFW content using AI is one of the most powerful techniques in Stable Diffusion. The img2img feature lets you take any source image and reimagine it with complete creative control. Whether you want to change clothing, alter poses, or create entirely new scenes, img2img gives you the precision that text-to-image generation cannot match.
This guide covers everything you need to know about img2img for NSFW work in 2026. We will explore the best tools, the exact denoising settings for different results, inpainting techniques, ControlNet integration, and the ethical boundaries you need to understand. By the end, you will have a complete workflow for professional-grade photo transformations.
What Is img2img and Why It Matters for NSFW
Img2img is a Stable Diffusion feature that takes an existing image as input and generates a new version based on your text prompt. Unlike txt2img which creates images from scratch, img2img uses the structure and composition of your source photo as a foundation. This gives you precise control over the final output.
The key advantage for NSFW content is consistency. When you start with a real photo, the body proportions, lighting, and perspective are already correct. The AI focuses on applying your creative changes rather than guessing the basic structure. This produces more realistic results with fewer anatomy errors.
Img2img also solves the character consistency problem. You can take a photo of a person and generate multiple variations while keeping the same face, body type, and general appearance. This is impossible to achieve reliably with txt2img alone.
Understanding Denoising Strength: The Magic Number
Denoising strength is the single most important setting in img2img. It controls how much the AI changes your source image. Understanding this one parameter is the key to mastering img2img.
Low Denoising: 0.1 to 0.3
At this range, the AI makes subtle changes. The output looks almost identical to the source but with minor adjustments. Use this for:
Color correction and lighting adjustments. Change the mood of a photo without altering the subject.
Skin smoothing and minor beauty retouching. Remove small blemishes while keeping the natural look.
Background modifications. Change the environment while keeping the person unchanged.
Clothing color changes. Alter the color of existing clothes without changing the style.
At 0.1 to 0.3, the AI preserves almost all original details. This is the safest range for beginners because it is hard to produce bad results.
Medium Denoising: 0.3 to 0.5
This range produces moderate changes. The output keeps the general pose and composition but alters details significantly. Use this for:
Clothing style changes. Transform a casual outfit into lingerie or swimwear while keeping the pose.
Hairstyle modifications. Change hair color, length, or style while keeping the face.
Background replacement. Completely change the scene while keeping the subject.
Lighting style changes. Transform natural daylight into dramatic studio lighting.
At 0.3 to 0.5, you get creative freedom while maintaining the core structure of the source image. This is the most versatile range for general NSFW transformations.
High Denoising: 0.5 to 0.7
This range produces dramatic changes. The output keeps the basic pose but transforms almost everything else. Use this for:
Complete outfit changes. Transform a fully clothed photo into nude or lingerie content.
Body shape modifications. Adjust proportions while keeping the general pose.
Style transfers. Convert a real photo into a painted or illustrated style.
Scene reimagining. Place the subject in a completely different environment.
At 0.5 to 0.7, the AI takes significant creative freedom. Results can vary widely, so expect to generate multiple images and select the best ones.
Very High Denoising: 0.7 to 0.9
At this range, the output is almost a new image. Only the basic composition remains from the source. Use this for:
Extreme transformations. Complete reimagining of the subject while keeping the pose.
Artistic reinterpretations. Turn a photo into a completely different artistic style.
Concept exploration. Use the source as loose inspiration for something new.
At 0.7 to 0.9, results become unpredictable. The connection to the source image is weak, and you may need many attempts to get usable results.
Maximum Denoising: 1.0
At 1.0, img2img becomes essentially txt2img. The source image provides almost no guidance. This is rarely useful for photo transformations because you lose the main advantage of img2img.
Best Tools for img2img NSFW Work
Forge: The User-Friendly Choice
Forge is the recommended interface for img2img work. It provides a clean interface with all essential controls easily accessible. The img2img tab is built directly into the main interface.
Step-by-step Forge workflow:
Step 1: Launch Forge and navigate to the img2img tab.
Step 2: Drag and drop your source image into the input area. Supported formats include JPG, PNG, and WEBP. For best results, use images at least 512×512 pixels. Higher resolution sources produce better outputs.
Step 3: Write your positive prompt describing the desired output. Be specific about clothing, pose, lighting, and style. Include quality tags like photorealistic, detailed skin, professional photography.
Step 4: Write your negative prompt to exclude unwanted elements. Include deformed hands, blurry, low quality, bad anatomy.
Step 5: Configure generation settings. Set sampling method to DPM++ 2M Karras. Set steps to 25-30. Set CFG scale to 7. Set denoising strength to 0.5 as a starting point.
Step 6: Choose resize mode. Crop and resize keeps the aspect ratio and crops excess. Resize and fill stretches the image to fit. For most work, Crop and resize is safer.
Step 7: Set output dimensions. Match the source aspect ratio for best results. Common sizes are 512×512, 768×768, or 1024×1024 for SDXL.
Step 8: Click Generate. On an RTX 3060 with 12GB VRAM, img2img takes about 30 to 40 seconds per image.
Step 9: Review the result. If the transformation is too strong, lower denoising to 0.3-0.4. If it is too weak, increase to 0.6-0.7.
ComfyUI: The Advanced Workflow
ComfyUI offers more flexibility through its node-based system. The img2img workflow uses a KSampler node with a denoise parameter that functions identically to Forge’s denoising strength.
Advantages of ComfyUI for img2img:
Multi-pass refinement. Run multiple img2img passes sequentially, each with different denoising values. This builds up changes gradually for maximum control.
Conditional img2img. Apply different denoising values to different areas of the image using masks.
ControlNet integration. Add ControlNet nodes for pose control, depth guidance, or style transfer within the same workflow.
Batch processing. Process multiple images with the same settings automatically.
ComfyUI requires more setup but rewards experienced users with unmatched flexibility. For professional production work, ComfyUI is the preferred choice.
Online Services: Quick Solutions
Civitai Generation Service offers img2img through their web interface. You upload a source image and use credits to generate variations. This is convenient for quick tests without local setup.
Mage.space provides a free tier with img2img capabilities. It is limited in resolution and features but works for basic transformations.
DiffusionBee is a macOS app that brings Stable Diffusion to Apple computers. It supports img2img with a simple interface perfect for Mac users.
Online services are good for beginners but have limitations. They offer less control, may have content filters, and charge per generation. For serious work, local installation is recommended.
NSFW Transformation Techniques
Clothing Removal and Changes
The most common use case is transforming clothed photos into lingerie or nude content. This requires careful prompt engineering and appropriate denoising settings.
Recommended approach:
Use denoising 0.6 to 0.7 for clothing removal. Lower values do not change enough. Higher values lose the connection to the source.
Write specific prompts. Instead of just nude, describe the desired look: wearing elegant black lingerie, sheer fabric, detailed lace. Specific prompts produce better results than vague ones.
Use NSFW-trained checkpoints. Models like RealVisXL, Pony Diffusion, or Illustrious understand adult content better than general-purpose models. The results are more anatomically correct and visually appealing.
Add quality tags. Include photorealistic, detailed skin, professional lighting, 8k quality. These tags push the AI toward higher quality outputs.
Negative prompts matter. Include clothing, fabric, text, watermark in negative prompts to prevent unwanted elements from appearing.
Face and Identity Preservation
When transforming photos, you often want to keep the same face while changing everything else. Several techniques help achieve this.
ControlNet IP-Adapter is the most reliable method. It extracts the face from your source image and applies it to the generated output. The result keeps the identity while allowing full body transformations.
FaceID LoRA models provide another approach. Train a LoRA on 10 to 20 images of the target face, then use it in img2img at 0.6 to 0.8 weight. This maintains consistency across multiple generations.
Low denoising on face area. Use inpainting to mask the face and apply lower denoising (0.2 to 0.3) to that area while using higher denoising (0.6 to 0.7) on the body. This preserves facial features while transforming the body.
Background and Environment Changes
Changing the background while keeping the subject is a common request. This is actually one of the easiest img2img transformations.
Use denoising 0.4 to 0.5. This is enough to change the environment while keeping the person mostly unchanged.
Describe the new background in detail. Beach sunset, luxury hotel room, tropical garden. Specific descriptions produce better environments than generic ones.
Use inpainting for precise control. Mask the background area and apply img2img only to that region. This leaves the subject completely untouched while transforming the surroundings.
Inpainting: Precision Control
Inpainting is img2img applied to a specific area of the image. It is the most precise tool for targeted modifications.
Forge Inpainting Workflow
Step 1: In the img2img tab, switch to the Inpaint sub-tab.
Step 2: Upload your source image.
Step 3: Use the brush tool to paint over the area you want to change. The masked area will be transformed. The unmasked area stays exactly the same.
Step 4: Write a prompt describing what should appear in the masked area.
Step 5: Set denoising to 0.5 to 0.7. Inpainting typically needs higher denoising than full img2img because the AI has less context to work with.
Step 6: Generate. The masked area transforms while ai porn image generator everything else remains unchanged.
Important tips for inpainting:
Mask edges slightly beyond the area you want to change. This creates a smooth transition between the new and old content.
Use soft brush edges. Hard mask edges create visible seams in the final image.
Feather the mask by 10 to 20 pixels for natural blending.
For large areas, work in multiple passes. Mask and transform one section, then move to the next. This gives better control than trying to change everything at once.
Common Inpainting Use Cases
Clothing modification: Mask the clothing area and prompt for new garments.
Skin detail enhancement: Mask the face and use ADetailer-style prompts for better facial features.
Object removal: Mask unwanted objects and prompt for the background to fill ai nude generator free in.
Body part modification: Mask specific areas and adjust proportions or appearance.
Tattoo or accessory addition: Mask the target area and prompt for the new element.
ControlNet for img2img: Maximum Precision
ControlNet adds structural control to img2img. It forces the AI to follow specific patterns from your source image, making transformations more predictable.
Essential ControlNet Models for img2img
OpenPose: Controls body positioning. Use this when you want to keep the exact pose from your source photo while changing appearance. Essential for consistent character work.
Canny: Controls edge outlines. Use this to preserve the silhouette and general shape while altering colors, textures, and details.
Depth: Controls spatial relationships. Use this to clothes remover maintain correct 3D positioning when changing environments or adding elements.
IP-Adapter: Controls face identity. Use this to keep the same face across multiple transformations. This is the secret to consistent character generation.
ControlNet Workflow in img2img
Step 1: Install the ControlNet extension in Forge if not already installed.
Step 2: Download the required ControlNet models from HuggingFace. You need models matching your base checkpoint architecture.
Step 3: In the img2img tab, scroll down to the ControlNet section.
Step 4: Enable ControlNet Unit 1. Select your preprocessor (OpenPose, Canny, Depth) and model.
Step 5: Upload your source image to the ControlNet input. This can be the same as your img2img source or a different reference image.
Step 6: Set ControlNet weight to 0.8 to 1.0 for strong control. Lower weights give the AI more freedom.
Step 7: Generate with both img2img and ControlNet active. The AI follows your text prompt while respecting the ControlNet structure.
ControlNet adds 10 to 15 seconds per generation but dramatically improves consistency. For professional work, it is worth the extra time.
Advanced Techniques
Multi-Pass img2img
Professional creators often use multiple img2img passes to build up complex transformations gradually.
Pass 1: Use denoising 0.3 to make subtle adjustments to lighting and color.
Pass 2: Use denoising 0.5 to change clothing style.
Pass 3: Use denoising 0.6 to refine details and add finishing touches.
Each pass builds on the previous result, creating a polished final image. This approach is slower but produces higher quality than a single high-denoising pass.
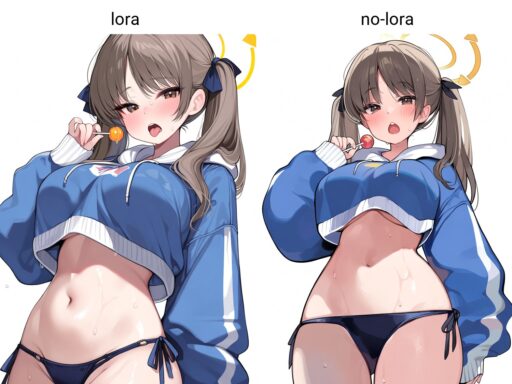
Img2img with LoRA Models
Adding LoRA models to img2img gives you style control and character consistency.
Character LoRAs: Use at 0.6 to 0.8 weight to maintain a specific face across transformations. This is essential for creating series or maintaining a persona.
Style LoRAs: Use at 0.3 to 0.5 weight to add artistic styles. Combine with low denoising to apply the style without losing the source structure.
Clothing LoRAs: Use at 0.4 to 0.6 weight to add specific garment types. These are trained on fashion images and produce realistic clothing details.
Quality LoRAs: Skin detail and lighting LoRAs at 0.3 to 0.5 weight enhance realism without changing composition.
Combining img2img with txt2img
For maximum creative control, combine both approaches:
Step 1: Generate a base image using txt2img with detailed prompts.
Step 2: Use that image as the source for img2img with moderate denoising (0.4 to 0.5).
Step 3: Apply targeted inpainting for specific adjustments.
Step 4: Use ControlNet to fix any pose or structure issues.
This hybrid workflow gives you the creative freedom of txt2img with the precision of img2img.
Best Checkpoints for NSFW img2img
Your base model significantly affects img2img results. Here are the top choices for NSFW transformations in 2026.
RealVisXL V5: The best all-around choice for photorealistic transformations. Excellent skin detail, natural lighting, and anatomical accuracy. Highly rated on Civitai for NSFW content.
Pony Diffusion V6 XL: Specialized for stylized and anime-influenced NSFW. Huge LoRA ecosystem. Fast generation with consistent quality.
Illustrious: Similar to Pony but with a different aesthetic. Great for clean, vibrant NSFW content. Strong community support.
Juggernaut XL v9: Versatile model that handles complex scenes well. Good for multi-person transformations and detailed environments.
Flux fine-tunes: For maximum photorealism, use Flux-based models with NSFW training. These require more VRAM but produce the highest quality results.
When choosing a checkpoint, consider your source material. Realistic photos work best with RealVisXL or Flux. Stylized or illustrated sources work better with Pony or Illustrious.
Practical Examples
Example 1: Subtle Retouching (Denoising 0.3)
Source: Portrait photo with natural lighting.
Goal: Enhance skin quality and adjust lighting.
Prompt: photorealistic portrait, detailed skin, soft studio lighting, professional photography.
Negative: blurry, low quality, deformed.
Result: The photo looks professionally retouched while keeping the original pose and expression.
Example 2: Clothing Change (Denoising 0.5, Pony Model)
Source: Casual photo in a t-shirt and jeans.
Goal: Transform into elegant lingerie.
Prompt: wearing elegant black lingerie, lace details, bedroom setting, soft lighting.
Negative: clothing, fabric, t-shirt, jeans.
Result: The person keeps the same pose and face but wears completely different clothing in a new setting.
Example 3: NSFW Transformation (Denoising 0.6-0.7)
Source: Fully clothed portrait.
Goal: Create tasteful nude content.
Prompt: nude portrait, elegant pose, soft lighting, detailed skin, professional photography.
Negative: clothing, fabric, text, watermark, deformed hands.
Result: Dramatic transformation keeping the pose but changing everything else. May require multiple attempts for best results.
Example 4: Face Swap with ControlNet (Denoising 0.4)
Source: Photo with face A, target face B.
Goal: Replace face A with face B while keeping the body.
Method: Use IP-Adapter with face B as the reference. Set denoising to 0.4 for body preservation. Add face-specific prompts.
Result: The body and pose stay identical, but the face matches the target.
Ethical and Legal Boundaries
Img2img technology is powerful and requires responsible use. Understanding the boundaries is essential for safe and legal operation.
What You Should Never Do
Never transform photos of real people without explicit consent. This includes celebrities, public figures, friends, and strangers. Creating NSFW content of real people without permission is illegal in most jurisdictions and violates platform policies everywhere.
Never use img2img to create deepfake content. Face swapping real people into NSFW scenarios is illegal and harmful. This technology should never be used to deceive or harm others.
Never attempt to bypass content filters on platforms. Most services have rules against non-consensual content. Violating these rules leads to permanent bans and potential legal consequences.
Safe and Legal Approaches
Use only your own photos or photos with explicit permission. If you are the subject, you have full rights to transform your own images.
Use AI-generated source images. Create the base image in txt2img, then use img2img to refine it. This avoids all consent issues since the source is entirely synthetic.
Use fictional characters. Transform illustrations, 3D renders, or other non-photographic sources. These do not involve real people and carry no consent concerns.
Follow platform rules. Civitai, OnlyFans, Patreon, and other platforms have specific policies. Read and follow them to maintain your accounts.
Consider using AI-generated faces. Tools like This Person Does Not Exist create realistic faces of people who do not exist. These are safe to use as references.
Troubleshooting Common Problems
Problem: Output Looks Nothing Like Source
Solution: Lower denoising strength to 0.3 or 0.4. The AI is changing too much. Also check that your prompt does not conflict with the source image content.
Problem: Face Gets Distorted
Solution: Use IP-Adapter or FaceID LoRA to preserve identity. Alternatively, mask the face and use lower denoising (0.2) on that area. Enable ADetailer for automatic face fixing.
Problem: Hands Look Wrong
Solution: Add hand-specific negative prompts. Use ControlNet OpenPose to control hand positioning. For critical hand shots, consider manual inpainting or generating hands separately.
Problem: Output Is Blurry or Low Quality
Solution: Increase steps to 30-40. Use a higher quality checkpoint like RealVisXL. Enable Hires Fix for upscaling. Check that your source image is high resolution.
Problem: Clothing Does Not Change Properly
Solution: Increase denoising to 0.6 or higher. Be more specific in your prompt about the desired clothing. Use clothing-specific LoRA models. Mask the clothing area for inpainting instead of full img2img.
Problem: Background Gets Changed When I Only Want to Change the Subject
Solution: Use inpainting instead of full img2img. Mask only the subject area. Alternatively, use low denoising (0.3) and specify background preservation in your negative prompt.
Performance and Hardware
Img2img requires more processing power than txt2img because it processes both the source image and the generation simultaneously.
Minimum Requirements
GPU: NVIDIA RTX 3060 with 12GB VRAM. This handles 512×512 img2img with most models.
RAM: 16GB system RAM. 32GB recommended for comfortable multitasking.
Storage: 50GB free space for models and outputs.
Recommended Setup
GPU: NVIDIA RTX 4070 Super or RTX 4090. The RTX 4090 handles 1024×1024 img2img with ControlNet at comfortable speeds.
RAM: 32GB to 64GB. Allows running multiple tools simultaneously.
Storage: 500GB NVMe SSD. Fast storage improves model loading times significantly.
Performance Tips
Lower resolution for testing. Work at 512×512 while adjusting settings, then increase to final resolution for the final generation.
Disable unnecessary extensions. Each active extension adds processing time. Only enable what you need.
Use batch processing. Generate multiple variations at once to find the best result faster.
Consider cloud GPU for occasional use. Renting an RTX 4090 for specific projects can be more cost-effective than buying one.
Future of img2img Technology
The technology is advancing rapidly. Here are trends to watch in 2026 and beyond.
Video img2img is emerging. Tools that transform video frames while maintaining temporal consistency are becoming available. This will enable animated NSFW content from video sources.
Real-time preview is improving. Some interfaces now show live previews as you adjust denoising and prompts. This speeds up the iteration process dramatically.
Smart masking is automating inpainting. AI-powered tools that automatically detect and mask specific body parts or clothing are in development. This will make targeted transformations much faster.
Style transfer is getting better. Models that apply the style of one image to another while preserving structure are improving. This will enable more sophisticated artistic transformations.
Final Workflow Summary
Here is the complete recommended workflow for NSFW img2img transformations:
Step 1: Select your source image. Use high-resolution, well-lit photos for best results.
Step 2: Choose your tool. Forge for beginners, ComfyUI for advanced users.
Step 3: Select your checkpoint. RealVisXL for photorealism, Pony for stylized content.
Step 4: Set denoising based on your goal. 0.3 for subtle changes, 0.5 for moderate, 0.6-0.7 for dramatic transformations.
Step 5: Write detailed prompts. Describe exactly what you want to change and what should stay the same.
Step 6: Add ControlNet if needed. Use OpenPose for pose control, IP-Adapter for face preservation.
Step 7: Generate multiple variations. Img2img results vary, so generate 5 to 10 images and select the best.
Step 8: Refine with inpainting. Use targeted masking for specific adjustments.
Step 9: Upscale for final output. Use Hires Fix or Ultimate SD Upscale for maximum resolution.
Step 10: Post-process if needed. Minor color correction or sharpening in external software adds polish.
Mastering img2img takes practice. Start with low denoising values and simple changes. Gradually increase complexity as you learn how the AI responds to different settings. With time, you will develop an intuition for what works and produce professional-quality transformations consistently.